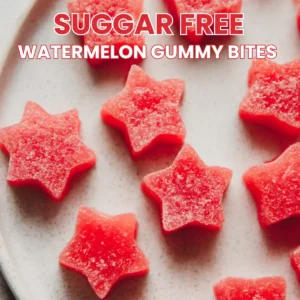
Made with real watermelon juice, grass-fed gelatin, and no added sugar.
- Prep Time: 10 minutes
- Chilling Time: 1 hour
- Total Time: 1 hour 10 minutes
- Cost per Serving: ~$1.50
- Calories per Serving: ~5 kcal
I started making these homemade Watermelon Gummy Bites for my dad. He’s been diabetic for years, and finding sugar-free treats that actually taste good has always been a challenge. He loves watermelon, and every summer, he’d snack on it like it was candy. But when he had to cut back on sugar, those juicy, sweet bites became a rare indulgence.
That’s when I had an idea—why not turn fresh watermelon juice into chewy, naturally sweet gummies? Something that still had that vibrant watermelon flavor, but without all the sugar spikes. I played around with a few versions, tweaking the texture and adjusting the sweetness until I got it just right: soft but chewy, sweet but not overpowering, and with just enough tang to make them fun to eat.
The best part? These gummies aren’t just for my dad. They’ve become a favorite in my house—whether it’s for a quick snack, a lunchbox treat, or a guilt-free way to satisfy a sweet tooth. They’re made with real fruit, packed with flavor, and completely sugar-free.
If you’re looking for a simple, healthy way to enjoy a classic candy experience without the sugar crash, these Watermelon Gummy Bites are for you. Easy to make, fun to eat, and totally customizable, they’re proof that cutting out sugar doesn’t mean cutting out flavor.
Why You’ll Love This Homemade Watermelon Gummy Bites Recipe
Naturally sweet, no added sugar. The fresh watermelon juice does most of the work here, bringing plenty of natural sweetness without needing loads of sweetener. If you’re watching your sugar intake, these gummies let you enjoy a fruity treat without the guilt.
Perfectly chewy, just like store-bought gummies. Thanks to high-quality gelatin, these gummy bites have that firm, satisfying texture—without the artificial ingredients you’d find in regular gummy candy.
Quick and easy to make. A few simple steps, no fancy equipment, and just one hour of chilling time. Whether you’re meal-prepping snacks for the week or making a fun treat for kids, these gummies come together in no time.
Easy to customize. Want them extra tangy? Add more citric acid. Prefer a different fruit? Swap watermelon for strawberry or raspberry juice. Love a touch of creaminess? Stir in a little coconut milk. The possibilities are endless.
Great for on-the-go snacking. These gummies hold their shape well, making them a great option for tossing into lunchboxes, keeping at your desk, or grabbing as a quick energy boost after a workout.
How to make these Homemade Watermelon Gummy Bites
Ingredients
The exact measurements for each ingredient can be found below in the recipe card.

Watermelon Juice: Fresh watermelon juice gives these gummies their natural sweetness and vibrant color. If you’re using fresh watermelon, strain it well to remove pulp—this helps create a smooth, uniform texture in the final gummies. Store-bought watermelon juice works too, just make sure it’s 100% juice with no added sugar.
Grass-Fed Gelatin: The key to getting that classic gummy candy chew. High-quality, grass-fed gelatin sets firmer and gives the best texture. If you prefer softer gummies, you can slightly reduce the amount, but don’t skip it—gelatin is what makes these bites hold their shape.
Powdered Erythritol: A gentle touch of sweetness without the sugar. Powdered erythritol dissolves seamlessly into the mixture, avoiding any grainy texture. Monk fruit or allulose can be used as well, but stick to a powdered form for the best results.
Lemon Juice: A little acidity balances out the sweetness of the watermelon and enhances the fruity flavor. Freshly squeezed is best, but bottled lemon juice will work in a pinch.
Watermelon Extract (Optional): If your watermelon isn’t super ripe, a little watermelon extract can help intensify the flavor. It’s not essential, but it does take these gummies to the next level.
Citric Acid (For Sour Gummies): Want that tangy, puckering sour effect? A small amount of citric acid mixed with sweetener gives these gummies a classic sour candy coating. Adjust to taste if you love extra tartness.
Step-by-Step Instructions

1. Prepare the Watermelon Juice
Start by blending about 1 ½ cups of diced watermelon until smooth. Pour the mixture through a fine-mesh sieve into a bowl, pressing with the back of a spoon to extract as much juice as possible. You’ll need exactly 1 cup of juice for this recipe. If you’re using store-bought watermelon juice, just measure it out and move on.
2. Bloom the Gelatin
Pour the watermelon juice into a small saucepan—don’t turn on the heat yet. Sprinkle the gelatin evenly over the surface and let it sit for 5 minutes. This step allows the gelatin to absorb the liquid and soften, preventing any clumps later on. You’ll know it’s ready when the surface looks wrinkled.
3. Heat and Sweeten
Turn the burner to low heat and begin whisking gently. Add the powdered erythritol and lemon juice, stirring constantly until the gelatin dissolves completely. This should take about 2–3 minutes—just warm enough to melt everything smoothly, but not so hot that it boils. If you’re using watermelon extract, stir it in now.
4. Pour and Chill
Carefully pour the mixture into silicone gummy molds or a small baking dish lined with parchment paper. Silicone molds make it easy to pop out individual gummies, but if you’re using a baking dish, you can cut them into squares later. Transfer the molds or dish to the refrigerator and let the gummies chill for at least 1 hour, or until firm to the touch.
5. Unmold and Coat (Optional)
Once set, pop the gummies out of the molds. If you used a baking dish, slice them into bite-sized pieces with a sharp knife. For a sour candy effect, mix powdered erythritol and citric acid in a small bowl, then toss the gummies in the coating until evenly dusted.
Store the gummies in an airtight container in the fridge, where they’ll keep fresh for up to one week—though they probably won’t last that long!
Tips for Perfect Gummy Bites
Use high-quality gelatin. Not all gelatin is created equal. Grass-fed gelatin gives the best chew—firm but not too tough. If you prefer softer gummies, slightly reduce the amount of gelatin, but don’t go too low, or they won’t hold their shape.
Bloom the gelatin properly. Skipping this step is a fast track to lumpy, uneven gummies. Sprinkle the gelatin evenly over the watermelon juice and let it sit for 5 minutes before heating. This ensures a smooth, uniform texture.
Keep the heat low. High heat can weaken gelatin’s setting power. You want just enough warmth to dissolve everything—no boiling allowed. If it gets too hot, remove it from the burner and stir until smooth.
Customize the texture. Want firmer gummies? Add an extra ½ tablespoon of gelatin. Prefer something softer? Reduce it slightly. Play around until you find your perfect bite.
Get that classic sour gummy effect. For a true candy shop experience, coat the gummies in a mix of powdered erythritol and citric acid after they’ve set. More citric acid = more tang, so adjust to taste.
Store them right. Keep your gummies in an airtight container in the fridge to maintain their perfect chewy texture. If left out too long, they’ll start to soften. They last about one week—but let’s be honest, they’ll be gone way before that.
Perfect Pairings
These Watermelon Gummy Bites may be bite-sized, but they pack a punch of flavor—and they’re even better when paired with the right snack or drink.
A refreshing summer drink. Pair these gummies with a glass of sparkling water with a squeeze of lime for a light, fizzy contrast. If you’re feeling fancy, add a few gummies directly into your drink for a fun, fruity twist.
A creamy frozen treat. Want to make it a real dessert moment? Try these gummies alongside a scoop of Blueberry Sorbet or Lemon Cheesecake Ice Cream—the mix of chewy and creamy textures is pure bliss.
A grab-and-go snack box. These gummies are great in a DIY snack box with nuts, cheese, and dark chocolate—a little sweet, a little savory, and totally satisfying.
A post-workout boost. Need something quick after a workout? These gummies give you a naturally sweet energy boost without any sugar crashes. Pair them with a handful of almonds or a protein smoothie for a balanced snack.
When to Serve These Gummies
These gummies are easy to make, easy to store, and perfect for any occasion. Here’s when you’ll want to have a batch ready:
As a healthy treat for kids (or adults). Whether it’s for a school lunchbox or an afternoon snack, these gummies are a great candy alternative that both kids and grown-ups will love.
For road trips and travel. They hold their shape well, don’t need refrigeration right away, and are a mess-free snack—perfect for tossing into your bag before heading out.
During movie night. Instead of store-bought gummy candies loaded with sugar and artificial flavors, keep a bowl of these on the table. Pair them with some homemade popcorn and you’ve got the ultimate sweet-and-salty combo.
For summer gatherings. These gummies scream summer, making them a great addition to picnics, BBQs, or poolside snack trays. Bonus points if you serve them with a chilled, sugar-free watermelon slushie.
Whenever you want a guilt-free treat. No need for a special occasion—just keep a stash in the fridge for those moments when you’re craving something sweet but still want to stick to your healthy eating goals.
Kitchen Tools You’ll Need
1. Silicone Gummy Molds – If you want perfectly shaped, bite-sized gummies with that classic candy look, silicone molds are a must. They make it super easy to pop the gummies out once they’ve set. Try these BPA-free silicone gummy molds for hassle-free candy making.
2. Fine-Mesh Strainer – Straining the watermelon juice ensures your gummies have a smooth, pulp-free texture. A fine-mesh strainer helps remove any bits of fiber, leaving only pure, clear juice behind. This stainless steel fine-mesh sieve works perfectly for the job.
FAQ
Can I use store-bought watermelon juice?
Yes! Just make sure it’s 100% watermelon juice with no added sugar. If it contains pulp, strain it for a smoother gummy texture.
How long do these gummies last?
Store them in an airtight container in the fridge for up to one week. They hold their shape well but may soften slightly over time.
Can I make these gummies vegan?
Yes! Replace the gelatin with 1 ½ teaspoons of agar-agar powder. Keep in mind that agar sets firmer than gelatin, so the texture will be slightly different.
Why are my gummies too soft?
If they aren’t firm enough, your gelatin-to-liquid ratio may be off. Add ½ tablespoon more gelatin next time for a chewier bite
Can I freeze these gummies?
Freezing is not recommended. The texture changes once thawed, making them more brittle instead of chewy. Refrigeration is best.

Watermelon Gummy Bites
- Total Time: 1 hour 10 minutes
- Yield: 6 servings 1x
Description
These chewy and fruity watermelon gummy bites are made with real watermelon juice, grass-fed gelatin, and no added sugar. They’re a low-carb, keto-friendly alternative to store-bought gummies—perfect for a healthy snack, lunchbox treat, or post-workout energy boost.
Ingredients
For the Gummies:
1 cup fresh watermelon juice (strained)
3 tbsp grass-fed gelatin
2 tbsp powdered erythritol (or sweetener of choice)
1 tbsp lemon juice
½ tsp watermelon extract (optional, for extra flavor)
For a Sour Coating (Optional):
2 tbsp powdered erythritol
1 tsp citric acid (for a tangy kick)
Instructions
Blend about 1 ½ cups of diced watermelon until smooth. Pour the mixture through a fine-mesh sieve, pressing with a spoon to extract as much juice as possible. You should have 1 cup of smooth juice.
Pour the watermelon juice into a small saucepan (do not heat yet). Sprinkle the gelatin evenly over the surface and let it sit for 5 minutes to absorb the liquid. This prevents clumping.
Turn the burner to low heat and whisk gently. Add the powdered erythritol and lemon juice, stirring constantly until the gelatin fully dissolves (about 2-3 minutes). Do not let it boil. If using watermelon extract, stir it in now.
Carefully pour the mixture into silicone gummy molds or a small baking dish lined with parchment paper. Place in the refrigerator and chill for at least 1 hour, or until firm.
Once set, pop the gummies out of the molds (or cut into squares if using a baking dish). If you like sour gummies, toss them in a mix of powdered erythritol and citric acid for a tangy coating.
Notes
- For a smoother texture: Strain the watermelon juice thoroughly to remove any pulp.
- To adjust the firmness: Increase or decrease the gelatin slightly to get your preferred chewiness.
- Storage: Keep gummies in an airtight container in the fridge for up to one week.
- Make them vegan: Substitute agar-agar for gelatin (use 1 ½ teaspoons of agar-agar powder).
- Prep Time: 10 minutes
- Category: Snack
- Method: No-Cook, Refrigeration
- Cuisine: American
Nutrition
- Serving Size: 5 gummies
- Calories: 5kcal
- Sodium: 5mg
- Carbohydrates: 1g
- Protein: 2g
Keywords: watermelon gummy bites, keto watermelon gummies, sugar-free gummy recipe, homemade gummy candy, low-carb fruit gummies, healthy watermelon snacks, no-sugar-added gummies, DIY fruit gummies


Amaizing